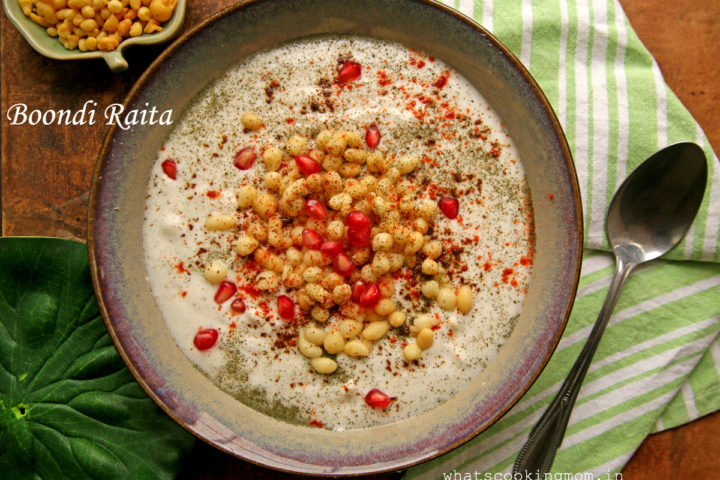
Oreo Truffles


I have been planning to make Oreo Truffles for quite some time. Who doesn’t like Oreo biscuits? And if they are coated with chocolate? hmm… very hard to resist. But all the recipe I found on net used cream cheese. Now my husband is not that big a fan of cream cheese so I was looking for another option. I have replaced cream cheese with regular cream in this recipe and truffles came out really good. These are really easy to make and can be made in large batches. The recipe does not require much effort though it needs some setting time. A must try recipe for all Oreo and chocolate lovers (I think that covers everyone)


Oreo Truffles
Adapted from: The Capitol Baker
makes around 8 Oreo truffles

Ingredients:
1 pkt. (around 12) Oreo biscuits
2 tbsp fresh cream
1 tbsp sugar
150 gms of white chocolate or regular chocolate for coating

To make Oreo Tru
ffles

These are really simple to make. Pulse Oreo cookies (including their cream filling) in a blender or food processor until they are crushed completely. Pour crushed cookies into a bowl and mix with cream and sugar. Use your hands to make soft dough. Put the dough in fridge for 30 minutes for dough to firm up. Roll the dough into balls. While rolling if you feel dough is still soft put it back in fridge for some more time. Place balls on a foil paper or wax paper lined baking sheet and put them back in fridge for 1 hour.
Melt chocolate in a microwave safe bowl. Heat the chocolate in 30 second interval and stir in between to avoid lumps. Keep it aside for 1 minute. Dip each ball in the melted chocolate to coat .Place them back on the sheet and refrigerate again until they are firm. These are best when chilled.

Posted in Recipe, sweets | Tagged , , , , | 2 Comments

Watermelon Mint Cooler


Watermelon Mint Cooler a very easy and delicious drink and it will make you forget all about harsh summers for some time. All you need to do is blend water melon with mint, lemon or any other fruit of your choice. Watermelon is an amazing fruit and I seriously don’t think that I can ever survive summers without it. I can eat a whole watermelon by myself ;-) . We all know that watermelon has a high quantity of Vitamin A & C. Watermelons also have a high water content (pretty obvious from its name) making it a perfect fruit for summers. You can either have plain watermelon juice or add soda to make watermelon spritzer. So here’s the perfect drink to beat the heat.

How to make Watermelon Mint Cooler
Preparation time: 5 minutes
makes 2 glass watermelon mint cooler

Ingredients:
2 cups watermelon cubes
Juice of ½  lemon
1 tbsp sugar
5-6 mint leaves
¼ tsp black salt/ salt
6-7 Ice cubes
Soda/sprite ( if you want to make watermelon spritzer)
Mint leaves and lemon wedge for garnish

To make Watermelon Mint Cooler
Remove seeds from the watermelon and blend with mint leaves and sugar in a blender or food processor. Strain if necessary. Add lemon juice and black salt. Serve chilled with ice. Garnish with mint or lime wedges.

For watermelon Spritzer fill half glass with juice and top up with soda.


Posted in Drinks, indian, Recipe | Tagged , , , , , , | 1 Comment

Handmade cards


I know, I know. It’s been a long time since I have submitted anything in activity since Diwali. Actually I was enjoying cooking so much that it got a little neglected and with kid’s exams, sports classes and all that didn’t get much time for crafts. I love giving handmade cards(receiving too;-))to relatives and always involve my kids in card making. Luckily I have found a great partner in my elder son who enjoys making cards.

Today I am sharing two handmade cards made by my son S. Both these handmade cards are very easy and super fun to make. You can easily vary them according to your choice. So go ahead and make somebody’s day by gifting them these handmade cards.

For this card you will need
Scrapbook sheets
Glitter gel pens
sketch pens
Faber- Castell craft Scissors with 4 creative cuts
glue stick

Just cut leaves and bright colorful flower petals experimenting with different cuts of the scissors. It’s really fun and you will enjoy it as much as your kids. Stick these on a bright colored scrapbook card folded in half. Decorate it with Glitter pens and sketch pens.


For this card you will need
Red Scrapbook sheet
2 paper napkins (I have used pink and white)
glue stick
sketch pens (green and brown)
pencil colors (green and brown)
Butterfly sticker
Green sheet for grass

Fold a red scrapbook sheet in half. Draw and color leaves and stem on it using sketch pen. Cut 3 thin strips of tissue papers. Start rolling with white tissue and fold in pink tissue. You can use only one color also if you like. Press it with your hands a little and stick on the card. Make remaining flowers in the same way. Decorate with stickers.

Inspiration for the cards

Posted in Kids, Kids Activity | Tagged , | 3 Comments

Oven baked French fries


wow .Oven baked French fries. The second I ate these fries the first thing that came to my mind was – why did not I try them earlier? No greasy oil to block your arteries, just potatoes, olive oil, salt and pepper. Which means that now I don’t have to think of excuses when my kids ask for them. Nor do I have to give my hubby those looks when he reaches out to grab some of those fries. Or picture myself at 100 kg when I crave for these sinfully addictive fries. That is a relief. It definitely is.
Now we can easily substitute our regular fried potato in aloo pyaz, fried aloo gobhi or dum aloo with these baked potato.
These are really simple to make though they take some time in baking. But the result is so good (and healthy please don’t forget) that you would not mind the wait. I served them with cucumber mint yogurt dip.

How to make Oven baked French fries

Preparation time: 3 minutes
Cooking time: total 30-40 minutes

ingredients:
for fries
3 large potatoes
4 tbsp olive oil
½ tsp salt
¼ tsp red pepper powder
¼ tsp black pepper powder
½ tsp chaat masala (optional)

coriander ( Cilantro) leaves to garnish

for cucumber mint  yogurt dip
½ cup hung curd/ yogurt
6-7 Mint leaves finely chopped
½ cucumber grated
salt and pepper to taste

To make Oven baked French fries
Preheat your oven to 200 C.
Wash potatoes thoroughly and peel them. Cut them lengthwise into even sized wedges. I prefer thin wedges as they bake quickly and thoroughly. Prick them with a fork or knife. In a bowl add potatoes, 2 tbsp oil and rest of the ingredients. Toss well to coat the potatoes well with spices. You can adjust spices according to your taste.


Spread rest of the oil on the baking tray and arrange potatoes in a single layer. Bake them for 20 minutes. Turn them over using a metal spatula and bake again for 10 minutes until crisp and golden brown. Drain them on a paper towel to drain any excess oil. That’s it, enjoy them without any guilt.

To make cucumber mint yogurt dip
mix hung curd, mint and cucumber in a bowl. Season it with salt and pepper.

Posted in baked, Recipe, snacks | Tagged , , , , , , , , | 6 Comments

Tomato Basil Bruschetta


Bruschetta (Italian pronunciation-brusketta) is usually served as a snack or an appetizer. It consists of roasted French bread or baguette topped with extra virgin olive oil, tomato, basil, garlic, salt and pepper. I have made some changes according to my taste (don’t I always ;-) ) and added onions and capsicum for color and taste. You can easily make these for a large batch and prepare different toppings in advance to serve as an appetizer or you can turn it into a light lunch as we did.

It’s a very simple recipe (this type are my favorite-minimum effort, great results). Look for really red and perfectly ripe tomatoes and chop them as nicely as you can as it is the main ingredient in Bruschetta and really dominates the taste. Hot bread topped with tomato mixture and cheese. Hmm….    yummy. Need I say more.


How to make Tomato Basil Bruschetta
Preparation time: 5 minutes
Cooking time: total 15 minutes
makes around 12 slices
ingredients:
1 loaf French bread or baguette
3 ripe red tomatoes diced
7-8 basil leaves chopped
2 cloves garlic minced
1 onion chopped
½ yellow capsicum chopped
salt and ground black pepper to taste
½ tsp oregano
chopped coriander (cilantro) leaves (optional)
¼ cup extra virgin olive oil
3 tbsp shredded Mozzarella cheese


To make Tomato Basil Bruschetta
Preheat the oven at 180 C for 10 minutes. In a large bowl combine tomato, basil, onion, garlic, yellow capsicum. Season this with oregano, salt and black pepper. Allow this mixture to sit for at least 30 minutes for all the flavors to blend well.

Cut the bread diagonally into slices.

Drizzle with olive oil on both sides. On a wire rack or baking sheet arrange the slices in a single layer and let them grill for 5 minutes until slightly brown and crisp. You can also toast your slices but grilling is a better option.

Spread the tomato mixture evenly over baguette slices.

Top the slices with Mozzarella cheese and put back in oven for 5 minutes to melt the cheese.

Sprinkle a few drops of olive oil before serving. Serve hot.
tips:
you can add minced garlic in tomato mixture or you can rub it on hot toasted slices.

Posted in baked, breakfast, Kids, Recipe, snacks | Tagged , , , , , , , , | Leave a comment

Virgin Mojito


Last week we went to a party where they were serving Virgin Mojitos. Virgin Mojito is a great summer drink. It is a mocktail which is made with lemon, mint and soda/sprite. I am not much of a mocktail person but this drink was so refreshing with its minty flavor that I had 2-3 glasses before I knew it. You could guess all the ingredients even with one sip- mint, lemon, sugar and soda for fizz yet all the flavors were blended really well. A perfect drink for all mint flavor lovers.


How to make Virgin Mojito
Preparation time: 5 minutes
No cooking required
makes 1 glass Virgin Mojito

ingredients:
10 fresh mint leaves
2 tbsp sugar
1 lemon
Ice cubes as desired
200 ml Sprite
Fresh mint leaves to garnish

To make Virgin Mojito
Chop the mint leaves. Cut lemon into small wedges and remove the seeds carefully. Keep one aside for garnish.

Crush mint leaves, sugar and lemon wedges in a tall glass using a wooden spoon for lemons to release all their juice and to blend in the flavors. Crushing of mint and lemon is referred to as muddling and is generally done with a muddler.

Add ice and top up with Sprite and mix well. Garnish with lemon slices and mint leaves. Serve chilled.

Posted in Drinks, Recipe | Tagged , , , | 5 Comments

Homemade Bounty Bars


Bounty bars or mounds are chocolate bars which have a coconut filling coated with chocolate (white or dark). Homemade Bounty bars is a perfect recipe for chocolate and coconut lovers. It’s a very basic recipe but tastes delicious.

When I first read the recipe on twin-food blog I could not believe that these delicious bars could be so simple and easy to make at home. The original recipe called for using chocolate for coating but I did not have them at home and I certainly was not in a mood to wait. So I made chocolate at home to coat the bars. The credit for chocolate recipe goes to my husband, Axat who is an expert in making chocolate at home. Lucky me ;-)
These homemade bounty bars will a regular sweet in my home now just like coconut burfi.


How to make Bounty Bars
Preparation time: 5 minutes
Cooking time:  5 minutes
setting time: 2 hours

ingredients:
for coconut filling:
125 gms desiccated coconut
1/2 can condensed milk
1 tbsp powdered sugar
4-5 chopped almonds

for chocolate syrup:
1 tbsp butter
1 tbsp plain flour (maida)
4 tbsp drinking chocolate/cocoa
4 tbsp Sugar (if you use cocoa use 6 tbsp of sugar)
1 tbsp fresh cream


To make Bounty Bars
Mix desiccated coconut with milkmaid in a bowl. Add almonds and sugar. The mixture should be a little stiff. Now shape them according to your desire. It may be square, rectangle or round. Keep these in fridge for 1/2 hour for bars to set.

To make homemade chocolate syrup
Heat butter in a nonstick pan. Add plain flour and cook for 1 minute. Add drinking chocolate, sugar and cream. Let it cook for 2-3 minutes. Take chocolate syrup off the heat and cool it. The syrup will thicken on cooling so make sure you take it off the heat before it is too thick.
Dip all the bars in chocolate syrup and let them cool in fridge for another 1-2 hours (Half of my bars vanished in this setting time ;-) ).
Your homemade Bounty bars are ready. Decorate with almonds or desiccated coconut before serving.
Store them covered in fridge.

Tips:
If you want to save time, you can melt chocolate or chocolate chips for coating bars rather than making chocolate syrup at home.
To serve , bring bounty bars to room temperature.

Posted in Recipe, sweets | Tagged , , , , , | 5 Comments

Black carrot Kanji

A very Happy Holi to all my readers. 

Today I am posting recipe of Black carrot Kanji, a traditional drink usually made in sping season around Holi.  A colorful drink for a colorful festival. Perfect combination!

Holi is one of the most celebrated festivals of India which is equally popular among kids and adults. My son was up at 6 o clock (yes …in the morning) and was busy filling his balloons with water, assembling Gulal (Colors) and filling his waterguns with colored water.
I was not able to post any recipe for some time and the reason was that I was very busy with my son’s exams. As I am free now (love the kids holidays as no getting up early) so I will be posting some new recipes soon.

Black carrots are a rich source of antioxidants and nutrients and are inhibitors of LDL (bad cholesterol).

How to make Black Carrot Kanji
Preparation time: 10 minutes
ready to drink in 3 days

Ingredients:
4-5  black carrots
1 small Beet root (optional)
3 liters water
4 tsp rai (mustard seeds)
4 tsp salt
2 tsp red chili pepper

To make Black Carrot Kanji
It is very simple to make. Wash and scrape the carrots. Cut into pieces lengthwise. You can add Beet root to get a dark color.
Dry grind the mustard seeds and mix with salt and red chili powder. Mix all the ingredients in a glass jar or earthen pot. Stir well. Let it sit in sun for 3 days. Shake the jar 5-6 times a day. It should be ready in 3 days. Check the taste before serving.  Stir well and pour into glass with 2-3 pieces of carrots. Kanji should always be consumed in moderation, not more than 2 glasses in a day. Enjoy!

Posted in Drinks, indian, Recipe | Tagged , , , , | Leave a comment

5 Minute Eggless chocolate mug cakes


Yesterday was my parents Anniversary and I was in a celebration mood. So I decided to bake a cake. In my opinion Anniversary and birthday celebrations are incomplete without a cake (at least for me and my kids).  But regular oven cakes take 30-45 minutes which become a torture on my kids especially younger one who would ask around thousand times “Is the cake ready” or “when will the cake be ready mom?” Then there is the cooling time also. Absolute torture.

So I decided to make 5 Minute Eggless chocolate mug cake for this occasion. I have been making this cake for a long time now so to make it special we decided to dress it up with some whipped cream and jam. This is our regular cake just the quantities are reduced which reduces the cooking time and you can prepare these in regular Microwaves. No need of baking.
The best point about these 5 Minute eggless Mug cakes is that they are ready in 5 minutes from start to finish. Cooking time is only 2 minutes. These are also mess free as you have only one utensil to wash- your mug and that will also be clean the second you start eating this cake;-)

This cake also serves as the best candidate for late night chocolate cravings (Don’t smile, I know you also have them!) or as instant dessert after food.

How to make 5 Minute Eggless chocolate mug cakes

Preparation time: 3 minutes
Cooking time:  2 minutes
makes 1 eggless chocolate mug cake

ingredients:
4 tbsp plain flour(Maida)
4 tbsp Sugar
2 Tbsp cocoa
¼ tsp Baking powder
a pinch of salt
1 Tbsp milk powder
1 tbsp fresh cream or oil( I have used fresh cream)
2 tbsp milk

For whipped cream:
½ cup fresh cream
3 tbsp powdered sugar

½ tsp drinking chocolate for sprinkling (optional)
Strawberry jam (optional)


To make 5 Minute Eggless chocolate mug cakes

Take a microwave safe mug. Mix all the dry ingredients in the mug. Now mix all the wet ingredients. Mix thoroughly so that there are no lumps. Now microwave it on high for 2 minutes. Check by inserting a knife. The knife should come out clean. It should be ready in 2 minutes! but if it is not, you can microwave it for another 30 seconds.


Now to dress it up, top it with whipped cream or ice cream. To make whipped cream, add fresh cream with powdered sugar and whip till soft peaks are formed. Sprinkle some drinking chocolate over it. Add a spoon of strawberry jam or chocolate syrup. You can also add some fresh fruits of your choice to enhance the flavour.

Posted in baked, Recipe, sweets | Tagged , , , , , | 16 Comments

Roasted sweet and spicy nuts


We all know that Nuts are rich in antioxidants, proteins, vitamins, minerals and are a really good source of omega-3 fatty acids. Those nuts are a store house of nutrients. And the fats found in nuts are primarily unsaturated fatty acids which are good for heart health and lower the LDL. Now new studies suggest that nuts are helpful in reducing body weight as they have high fibre and protein content they make us feel fuller for longer. With so many benefits nuts deserve a special place in our daily diet. But sadly this was not the case. I was not able to get my kids to eat nuts especially walnut. I have tried overnight soaked nuts (little success) and adding them in sweets and desserts (no success at all). It’s hard to imagine that I went to such great lengths for a task which could be accomplished so easily.  Now I just roast them in microwave, spice them up and fill them in a jar. And they disappear so fast that it’s like magic.  So next time when you feel like binging on store bought chips or some other junk food try replacing them with these tasty and nutritious nuts. Spices and sugar add flavor to these nuts.

You can have them with tea, in the evening or as a late night snack (if you are like me and feel addicted to have tea and snacks while watching movies at night).These are the perfect snack to carry with you while travelling. So what are you waiting for, take out your microwavable bowls, roast nuts and enjoy winters and great health.
How to make Roasted sweet and spicy nuts

Preparation time: 2 minutes
Cooking time:  8 minutes

ingredients:
2 cup nuts of your choice(I have roasted almond, cashew and walnuts)
2 tbsp olive oil
salt and pepper to taste
1 tbsp powdered sugar( if you want it sweet)
¼ tsp red pepper powder
1/8 tsp cinnamon powder (optional)

To make Roasted sweet and spicy nuts

All you have to do is put nuts in a microwavable dish and microwave for 1 minute. Take them out mix thoroughly and microwave again for one minute. Keep on repeating this process for six minutes. Take olive oil in a bowl and mix spices and sugar to it. Mix in nuts. Now microwave for 2 more minutes. That’s it. Your roasted sweet and spicy nuts are ready. Roasting time may vary depending on your microwave or quantity so start checking after 5 minutes if nuts are done or not by tasting them.

Related Posts Plugin for WordPress, Blogger...
Posted in Recipe, snacks | Tagged , , , , | 12 Comments